Table of Contents
Introduction
MACSec Application in SDN space
Building and Testing MACSec application
Building and Installing MACSec
Building and installing WPA Supplicant
Testing and Verification
Introduction
MAC Security (MACsec) standard (IEEE 802.1AE) allows stations in a LAN to provide secure communication and confidentiality of transmitted data in Layer 2 level.
As per the standard each station supporting MACSec will have two essential entities
MAC Security Key Agreement Entity (KaY).
Entity responsible for key agreement between Port Access Entities(PAE) (PAE refer IEEE 802.1X standard)
MAC Security Entity (SecY)
SecY entity provides encryption of L2 packets based on the configuration provided by KaY.
Some of basic terms in MACSec standard are
Connectivity Association(CA)
Association that meets the requirements of the MACsec for connectivity between stations attached to an individual LAN.
Secure Channel(SC)
A unidirectional Secure Channel.
Each SC supports secure transmission of frames between CAs using symmetric key cryptography
A unique identifier is defined to identify each SCs and it is called Secure Channel Identifier (SCI).
Secure Association(SA)
Each SC is supported by an overlapped sequence of Security Associations (SAs).
SC comprises of sequence of Secure Association(SA), each with different Secure Association Key(SAK) for the secure transmission of frames.
Usually each station will have SA for transmission(called Generation SA) and SAs for receiving (called Verification) from each stations in CA.
MACSec Application in SDN space
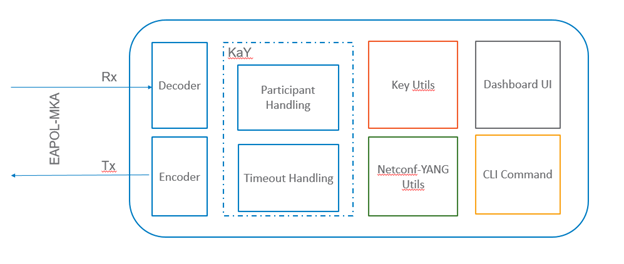
Usually KaY and SecY entities are coming together in MACSec supporting devices. But in SDN space only SecY component is coming in switches and KaY is usually implemented as NB application SDN controller. Typical design of such systems in ONOS will be as below
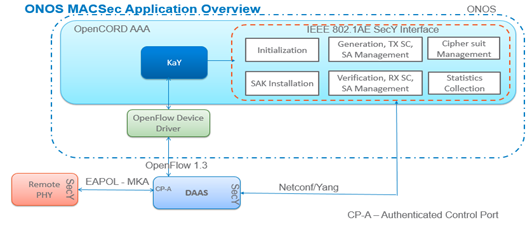
Figure 1: ONOS MACSec application overview
KaY application responsible for processing EAPOL-MKA traffic from RPHY devices to aggregation switch as part of key agreement process. Once keys are derived it configures aggregation switch through the interface provided by SecY, usually that will be NETCONF interface. Typically SecY interface supports following configurations
CipherSuite Management.
CA parameter configuration
Transmit, Receive SC, SA management
SAK Installation.
Statistics Collection
Vendors can have different YANG models for their SecY interfaces; KaY should aware of those models while interacting with SecY. For example IEEE 802.1AE standard SecY interface is defined as in Figure 2. where as OFDPA SecY interface is defined as in Figure 3
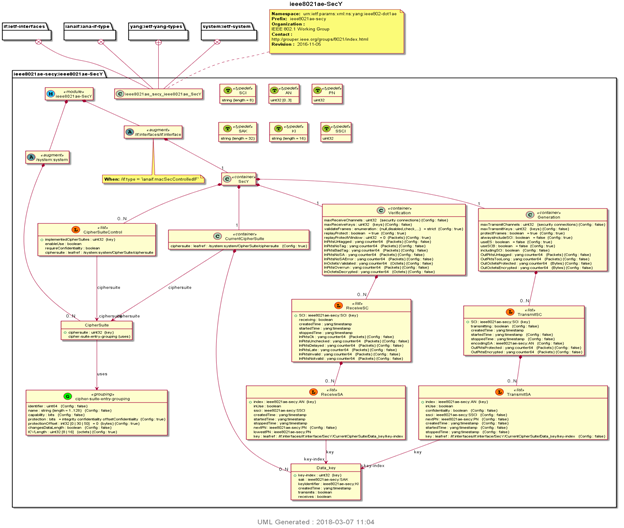
Figure 2: UML diagram of IEEE802.AE SecY interface
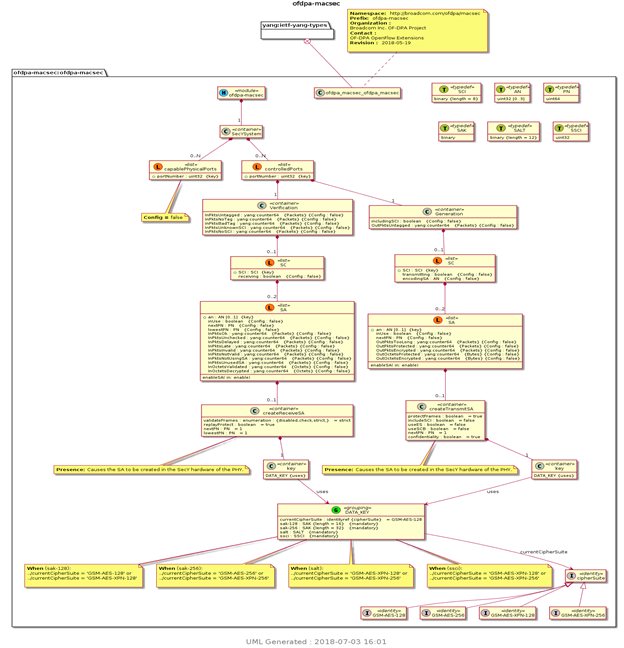
Figure 3: UML diagram of ofdpa-macsec SecY interface
Building and Testing MACSec application
Since MACSec supporting Whitebox switches under development, we can simulate (only key agreement and configuration stages; not actual L2 packet encryption) the setup using Mininet and ConfD as in Figure 4: MACSec Testbed.
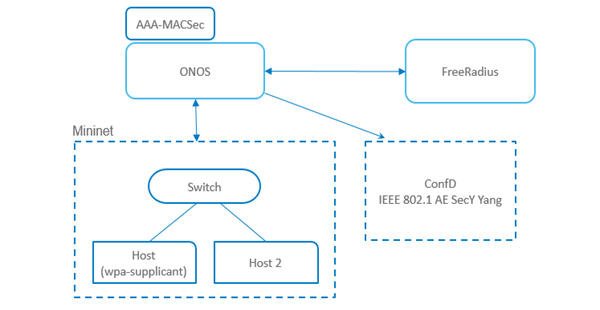
Figure 4 : MACSec Testbed
ConfD is used to simulate NETCONF/YANG interface of while box switches. Depending on different YANG models being loaded in to Confd, we can simulate different SecY interfaces.
1. Building and Installing MACSec
Build and run ONOS, use ONOS version 1.13.1
onos-buck build onos --show-output
onos-buck run onos-local
Build AAA and dependent applications like config, olt and sadis using the command
Use repo tool to checkout the source code.
Install repo and checkout source code
cd /usr/bin
sudo wget https://storage.googleapis.com/git-repo-downloads/repo
sudo chmod a+x /usr/bin/repo
After installing the repo create local clone of repository,
mkdir opencord
cd opencord
repo init -u https://gerrit.opencord.org/manifest
To get the source code execute the following command from repo installed directory
repo sync
After repo sync, aaa and its dependent applications like config, olt and sadis should be available in the path "/onos-apps/apps/".
aaa:
cd opencord/onos-apps/apps/aaa
mvn clean install -DskipTests -Dcheckstyle.skip=true
config:
cd opencord/onos-apps/apps/config
mvn clean install -DskipTests -Dcheckstyle.skip=true
olt:
cd opencord/onos-apps/apps/olt
mvn clean install -DskipTests -Dcheckstyle.skip=true
sadis:
cd opencord/onos-apps/apps/sadis
mvn clean install -DskipTests -Dcheckstyle.skip=true
Install AAA dependent apps
onos-app <ONOS-IP> install config/target/cord-config-1.5.0-SNAPSHOT.oar
onos-app <ONOS-IP> install olt/app/target/olt-app-2.0.0-SNAPSHOT.oar
onos-app <ONOS-IP> install sadis/app/target/sadis-app-2.2.0-SNAPSHOT.oar
From ONOS CLI, activate Netconf apps
org.onosproject.netconf
org.onosproject.drivers.netconf
Install AAA app
onos-app <ONOS-IP> install aaa/target/aaa-1.7.0-SNAPSHOT.oar
Push netcfg configuration file using the command
onos-netcfg <ONOS-IP> <Name of config file>
Sample netcfg configuration is given below,
{
"devices": {
"netconf:192.168.1.2:2022": {
"netconf": {
"ip": "192.168.1.2",
"port": 2022,
"username":"stack",
"password":"stack"
},
"basic": {
"driver": "netconf"
}
}
},
"apps":{
"org.opencord.aaa" : {
"AAA" : {
"packetCustomizer":"default",
"radiusConnectioType":"socket",
"radiusIp": "192.168.1.14",
"radiusServerPort": "1812",
"radiusSecret": "karaf"
},
"MACSEC" : {
"version": "1",
"capability": "2",
"ckn": "96437a93ccf10d9dfe347846cce52c7d",
"cak": "135bd758b0ee5c11c55ff6ab19fdb199",
"netconfDeviceId": "netconf:192.168.1.2:2022"
},
"org.opencord.sadis": {
"sadis" : {
"entries" : [ {
"cTag" : 1,
"id" : "s1-eth1",
"nasPortId" : "s1-eth1",
"sTag" : 1
}
],
"integration" : {
"cache" : {
"enabled" : true,
"maxsize" : 50,
"ttl" : "PT1m"
}
}
}
}
}
}
}
MACSec feature is enabled by configuring “MACSEC” section in netcfg configuration file. MACSEC section includes following details
version parameter refers to version of the MACSec.
capability denotes protection capability of ciphersuites, it can have the following values
0-integrity
1-confidentiality
2-offsetConfidentiality
Pre-shared static keys are given as ckn and cak.
"ckn": "96437a93ccf10d9dfe347846cce52c7d",
"cak": "135bd758b0ee5c11c55ff6ab19fdb199",
netconfDeviceId refers to the device Id of Netconf device ie. ConfD server which act as SecY interface of switch
Using ConfD server:
ConfD installation and setup
Download URL: https://developer.cisco.com/site/confD/downloads/
Downloaded zip file : confd-basic-6.2.linux.x86_64.zip
unzip confd-basic-6.2.linux.x86_64.zip
mkdir ConfD
cd confd-basic-6.2.linux.x86_64
sh confd-basic-6.2.linux.x86_64.installer.bin <PATH of the ConfD directory>
Run ConfD server
From Confd installation directory execute following commands
source confdrc
confd
(or)
confd --foreground --verbose -c ./etc/confd/confd.conf
To import yang files to ConfD server, compile yang files and copy that compiled files to required location as given below.
confdc –c <file.yang>
Copy '.fxs' files to /etc/confd folder and start the server
Using Netopeer2 server :
Netopeer2 Server installation and setup
- git clone https://github.com/CESNET/Netopeer2.git
- Copy required yang modules to Netopeer2/modules path.
Add netopeer2 server IP in Netopeer2/server/stock_config.xml
Required libraries
libyang
libnetconf2
sysrepo
Install libyang
git clone https://github.com/CESNET/libyang.git
Building and installation:
Build requirements:
Cmake >= 2.8.12
libpcre (devel package)
cmocka >= 1.0.0
- cd libyang
- mkdir build; cd build
- cmake ..
- make
- make install
Install libnetconf2
git clone https://github.com/CESNET/libyang.git
Required dependencies:
libssh
OpenSSL
Build and install libnetconf2
cd libnetconf2
mkdir build; cd build
cmake ..
make; make install
Install sysrepo
git clone https://github.com/sysrepo/sysrepo.git
Required libraries
libyang
Google Protocol Buffers
protobuf-c
libev
libredblack or GNU libavl (either of these two)
Build and install sysrepo
cd sysrepo
mkdir build;cd build
Command to configure build for production use
cmake -DCMAKE_BUILD_TYPE=Release -DCMAKE_INSTALL_PREFIX:PATH=/usr ..
make;make install
Install keystored
cd keystored
mkdir build; cd build
cmake ..
make
make install
Compile and install Netopeer2 Server
cd server
mkdir build; cd build
cmake ..
make
make install
Run Netopeer2-server
Start the processes in the following order,
- sysrepod –l 4
- sysrepo-plugind –l 4
- netopeer2-server –d –v
- Netopeer2 CLI
Execute the following command to connect Netopeer2 server from Netopeer2 CLI
netopeer2-cli
>connect –host <IP> --port 830
2. Building and installing WPA Supplicant
WPA Supplicant version 2.6 onwards supports MACSec. In this experiment we are using pre-shared CAK (Connectivity Association Keys), so for such support we should patch it in following way
wget -c https://w1.fi/releases/wpa_supplicant-2.6.tar.gz
tar -zxvf wpa_supplicant-2.6.tar.gz
cd wpa_supplicant-2.6
mkdir patches
Apply custom changes, in wpa_supplicant/wpa_supplicant.c
void wpa_supplicant_initiate_eapol(struct wpa_supplicant *wpa_s) {
eapol_sm_notify_config(wpa_s->eapol, &ssid->eap, &eapol_conf);
if (wpa_s->key_mgmt == WPA_KEY_MGMT_NONE && ssid->mka_psk_set)
ieee802_1x_create_preshared_mka(wpa_s, ssid);
else if (ssid->macsec_policy == 1 && ssid->mka_psk_set) {
wpa_printf(MSG_DEBUG,"Initializing for Preshared CAK mode....");
ieee802_1x_create_preshared_mka(wpa_s, ssid);
wpa_printf(MSG_DEBUG,"Done....");
}
else
ieee802_1x_alloc_kay_sm(wpa_s, ssid);
}
For building follow the below steps,
cd wpa_supplicant/
make clean
cat > .config << "EOF"
CONFIG_BACKEND=file
CONFIG_EAP_MD5=y
CONFIG_CTRL_IFACE=y
CONFIG_DEBUG_FILE=y
CONFIG_DEBUG_SYSLOG=y
CONFIG_DEBUG_SYSLOG_FACILITY=LOG_DAEMON
CONFIG_DRIVER_NL80211=y
CONFIG_DRIVER_WEXT=y
CONFIG_DRIVER_WIRED=y
CONFIG_EAP_GTC=y
CONFIG_EAP_LEAP=y
CONFIG_EAP_MSCHAPV2=y
CONFIG_EAP_OTP=y
CONFIG_EAP_PEAP=y
CONFIG_EAP_TLS=y
CONFIG_EAP_TTLS=y
CONFIG_IEEE8021X_EAPOL=y
CONFIG_IPV6=y
CONFIG_LIBNL32=y
CONFIG_PEERKEY=y
CONFIG_PKCS12=y
CONFIG_READLINE=y
CONFIG_SMARTCARD=y
CONFIG_WPS=y
CONFIG_MACSEC=y
CFLAGS += -I/usr/include/libnl3
EOF
Edit MACSEC_CKN_LEN in wpa_supplicant/config_ssid.h as below
#define MACSEC_CKN_LEN 16
Build and install
sudo make BINDIR=/usr/sbin LIBDIR=/usr/lib install
Configure WPA_Supplicant in /etc/config/wpa_supplicant.conf. Sample configuration given below
ctrl_interface=/var/run/wpa_supplicant
eapol_version=3
ap_scan=0
fast_reauth=0
network={
key_mgmt=WPA-EAP
identity="stack"
password="stack"
macsec_policy=1
mka_cak=135BD758B0EE5C11C55FF6AB19FDB199
mka_ckn=96437A93CCF10D9DFE347846CCE52C7D
}
3. Testing and Verification
Run ONOS and activate MACSec KaY and dependent applications
Activate dependent apps:
app activate org.opencord.config
app activate org.opencord.olt
app activate org.opencord.sadis
Activate aaa application:
app activate org.opencord.aaa
Start mininet and from mininet console from host context start supplicant
sudo mn --controller=remote,ip=192.168.1.2
mininet>h1 sudo wpa_supplicant -Dwired -ih1-eth0 -c/etc/config/wpa_supplicant.conf
On successful authentication, logs describing distributed SAK details should be shown in supplicant console like below
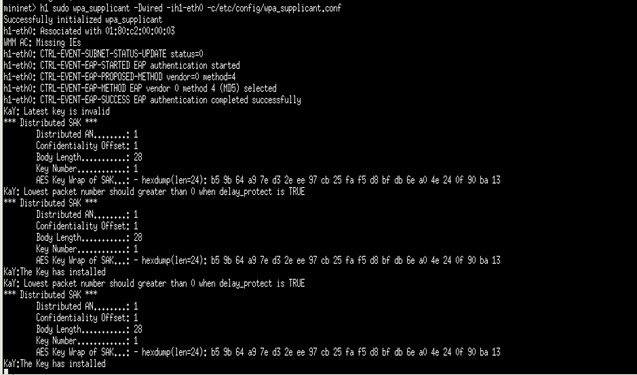
Figure 5: supplicant console output
SecY configurations like Key, Ciphersuites, Generation and Verification details generated as a part of MACSec can be verified in ConfD server using ConfD cli as below
source confdrc
confd_cli
show running-config
EAPOL-MKA exchange packet capture from mininet host will be something like below
