This page describes how to setup development environment and test VTN features manually for those who wants to add a new features to VTN. If you just want to see how CORD works, it is recommended to try CORD-in-a-Box.
Test environment setup
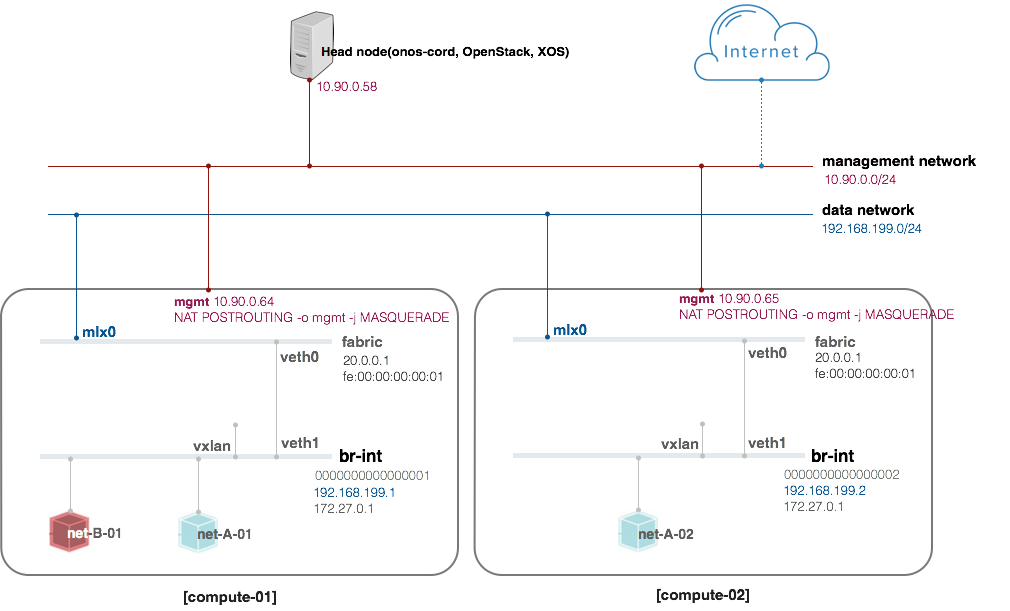
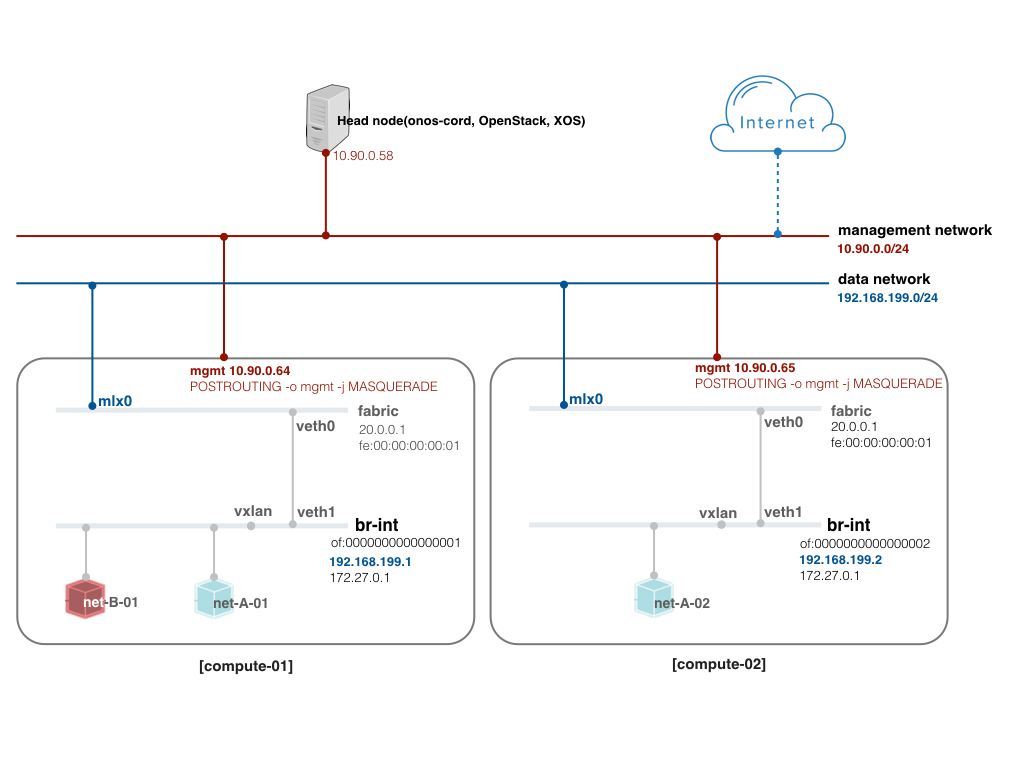
The figure below shows an example DEV environment of VTN. It doesn't include real leaf-spine fabric. Instead, we're going to mimic fabric switch and vRouter inside a compute node to test external access. That is, the "fabric" bridge in the figure corresponds to the fabric switch and Linux routing tables corresponds to vRouter. At least two physical interfaces are required for this setup, and at least two compute nodes are recommended to test VXLAN tunneling.
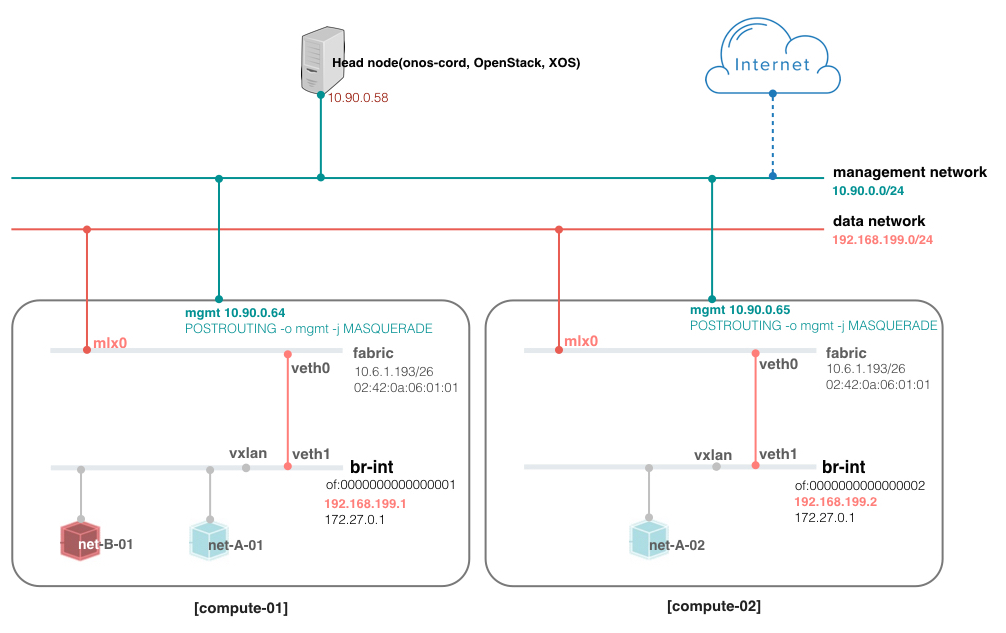
#!/bin/bash

# Data
sudo brctl addbr fabric
sudo ip link set fabric up
sudo ip link add veth0 type veth peer name veth1
sudo ip link set veth0 up
sudo ip link set veth1 up
sudo brctl addif fabric veth0
sudo brctl addif fabric mlx0
sudo ip addr flush mlx0
sudo ip link set address 02:42:0a:06:01:01 dev fabric
sudo ip link set address 02:42:0a:06:01:01 dev mlx0
sudo ip address add 10.6.1.193/26 dev fabric
sudo iptables -t nat -A POSTROUTING -o mgmt -j MASQUERADE
sudo iptables -I FORWARD 1 -s 10.6.1.193 -m mac --mac-source 02:42:0a:06:01:01 -m physdev --physdev-out mlx0 -j DROP
{
    "apps" : {
        "org.opencord.vtn" : {
            "cordvtn" : {
                "privateGatewayMac" : "00:00:00:00:00:01",
                "publicGateways" : [
                    {
                        "gatewayIp" : "10.6.1.193",
                        "gatewayMac" : "02:42:0a:06:01:01"
                    }
                ],
                "localManagementIp" : "172.27.0.1/24",
                "ovsdbPort" : "6640",
                "ssh" : {
                    "sshPort" : "22",
                    "sshUser" : "root",
                    "sshKeyFile" : "/root/node_key"
                },
                "openstack" : {
                    "endpoint" : "http://10.90.0.58:5000/v2.0/",
                    "tenant" : "admin",
                    "user" : "admin",
                    "password" : "ADMIN_PASS"
                },
                "xos" : {
                    "endpoint" : "http://10.90.0.58:80",
                    "user" : "padmin@vicci.org",
                    "password" : "letmein"
                },
                "nodes" : [
                    {
                        "hostname" : "compute-01",
                        "hostManagementIp" : "10.90.0.64/24",
                        "dataPlaneIp" : "192.168.199.1/24",
                        "dataPlaneIntf" : "veth1",
                        "bridgeId" : "of:0000000000000001"
                     },
                     {
                        "hostname" : "compute-02",
                        "hostManagementIp" : "10.90.0.65/24",
                        "dataPlaneIp" : "192.168.199.2/24",
                        "dataPlaneIntf" : "veth1",
                        "bridgeId" : "of:0000000000000002"
                     }
                ]
            }
        }
    }
}
#cloud-config
password: ubuntu
chpasswd: { expire: False }
ssh_pwauth: True
Tip) The following cloud-init script help to set password of "ubuntu" user to "ubuntu" for UEC image if you pass this script to Nova with "--user-data" option when you create a new VM.
Local management network test
Create the local management network in OpenStack with the IP range specified in the network-cfg.json "localManagementIp" field.
neutron net-create net-management
neutron subnet-create net-management 172.27.0.0/24
Tell VTN that this network is local management network with the following command and the json data.
$ curl -X POST -H "Content-Type: application/json" -u onos:rocks -d @data.json http://$OC1:8181/onos/cordvtn/serviceNetworks
{
    "ServiceNetwork": {
        "id": "UUID of net-management",
        "type": "management_local",
        "providerNetworks": []
    }
}
Now create a VM with the net-managment.
$ nova boot --flavor 2 --image ubuntu-14.04-server-cloudimg-amd64 --user-data passwd.data --nic net-id=[UUID of net-management] net-mgmt-01
- Can ping and ssh to net-mgmt-01 from the host machine
Basic functional tests
Basic tenant network test
neutron net-create net-A
neutron subnet-create net-A 192.168.0.0/24
neutron net-create net-B
neutron subnet-create net-B 192.168.1.0/24

nova boot --flavor 2 --image trusty-server-multi-nic --user-data passwd.data --nic net-id=[net-A-UUID] --nic net-id=[UUID of net-management] net-A-01
nova boot --flavor 2 --image trusty-server-multi-nic --user-data passwd.data --nic net-id=[net-A-UUID] --nic net-id=[UUID of net-management] net-A-02
nova boot --flavor 2 --image trusty-server-multi-nic --user-data passwd.data --nic net-id=[net-B-UUID] --nic net-id=[UUID of net-management] net-B-01
Create two tenant networks and virtual machines in OpenStack, and then test tenant network connectivity and isolation.
- Can ping between net-A-01 and net-A-02 with net-A(192.168.0.0/24) IP address
- Cannot ping between net-A-01 and net-B-01 with net-A(192.168.0.0/24) and net-B(192.168.1.0/24) IP address
Public network test
Create a public network in OpenStack with the gateway IP specified in the network-cfg.json "publicGateways".
neutron net-create net-public
neutron subnet-create net-public 10.6.1.192/26 --gateway 10.6.1.193
Tell VTN that this network is public network with the following command and the json data.
$ curl -X POST -H "Content-Type: application/json" -u onos:rocks -d @data.json http://$OC1:8181/onos/cordvtn/serviceNetworks
{
    "ServiceNetwork": {
        "id": "UUID of net-public",
        "type": "public",
        "providerNetworks": []
    }
}
Then create a virtual machine with the public network. You can also add local management network as a second interface for easy access of the VM. (If you don't have a special image that brings up the second network interface automatically, you should enable it manually inside the VM by running "sudo dhclient eth1".)
nova boot --flavor 2 --image trusty-server-multi-nic --user-data passwd.data --nic net-id=[UUID of net-public] --nic net-id=[UUID of net-management] net-public-01
- Can ping to 8.8.8.8 from the VM
Service dependency test: without XOS
Update net-A to have a dependency to net-B with the following command and json data.
$ curl -X POST -H "Content-Type: application/json" -u onos:rocks -d @data.json http://$OC1:8181/onos/cordvtn/serviceNetworks
{
    "ServiceNetwork": {
        "id": "UUID of net-A",
        "type": "private",
        "providerNetworks": [
            {
                "bidirectional": true,
                "id": "UUID of net-B"
            }
        ]
    }
}
In this example, net-A is a subscriber of the net-B but with bidirectional direct access.
- Can ping between net-A-01 and net-B-01
- For indirect access test: "tcpdump -i eth0 icmp" on net-A-01 and net-A-02, and try ping from net-B-01 to the gateway IP address of net-A, 192.168.0.1 in this example. See net-A-01 or net-A-02 gets ICMP request
Now, remove the dependency by updating the net-A.
$ curl -X PUT -H "Content-Type: application/json" -u onos:rocks -d @data.json http://$OC1:8181/onos/cordvtn/serviceNetworks/[UUID of net-A]
{
    "ServiceNetwork": {
        "id": "UUID of net-A",
        "type": "private",
        "providerNetworks": []
    }
}
- Cannot ping between net-A-01 and net-B-01
- For indirect test: see both net-A instances can't get ICMP request from net-B-01
Service dependency test: with XOS
First, remove all the instances and networks created before. Read this first to setup XOS, if you don't. Run the following command from the XOS machine.
$ sudo docker exec -it cordpod_xos_ui_1 /bin/bash
root@7a03629d4c36:/opt/xos# python /opt/xos/tosca/run.py padmin@vicci.org /opt/xos/tosca/samples/vtn-service-chain-ssh.yaml
After some time, two networks and two VMs, one for each network, are to be created.
- Can ping from VM mysite_one-2 to VM mysite_two-3
R-CORD use case tests
Additional setup
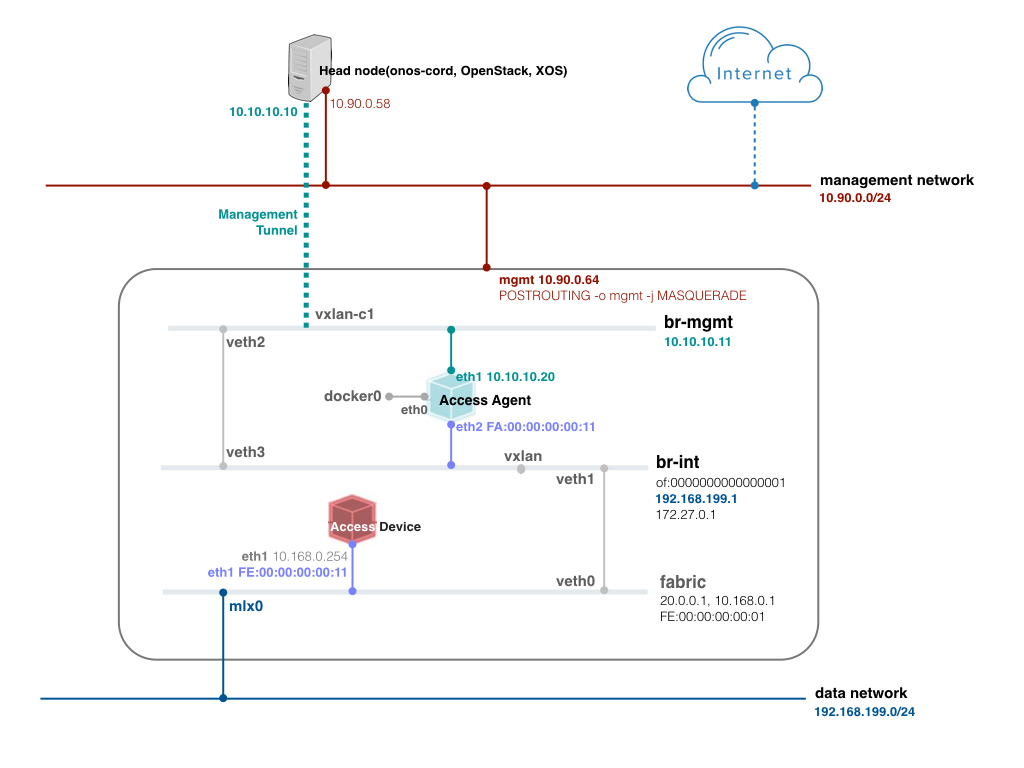
Additional setup is required to test R-CORD use case. It includes configuring a tunnel for the management network, bringing up Docker container and VM, which emulate access device and vSG respectively, and configuring VLANs inside them. The reason why configuring the tunnel for the management network is to avoid connection lost. In real deployment, physical interface for the management network, which is "mgmt" in the figure, would be added directly to the "br-mgmt" bridge.
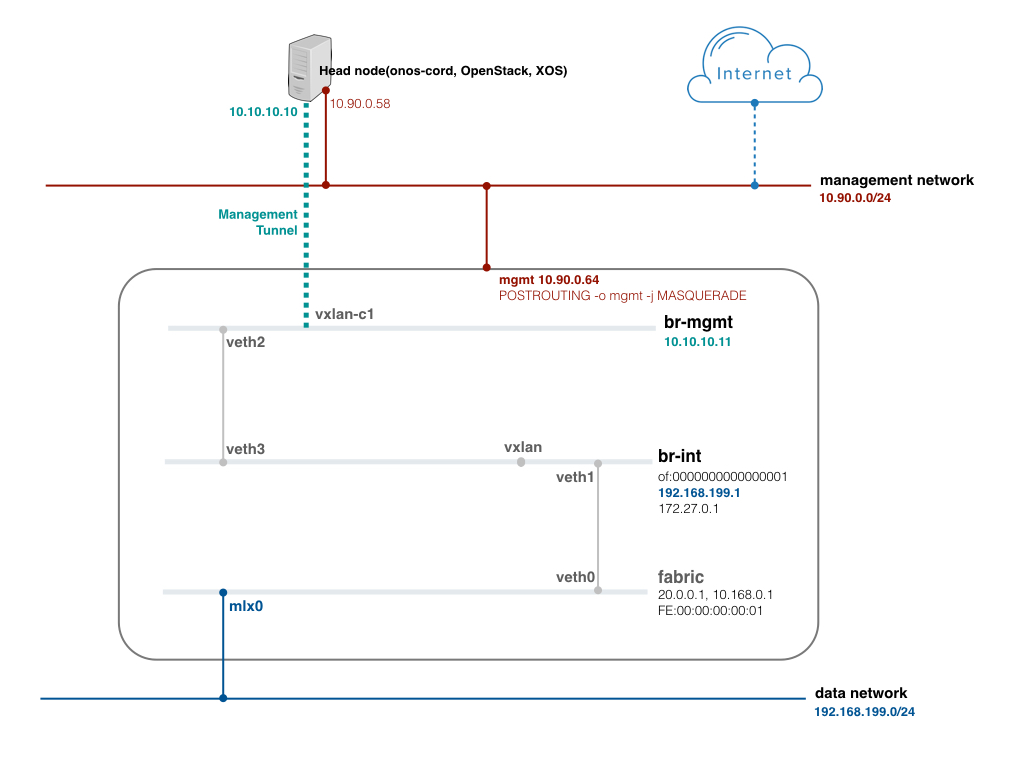
[Figure. R-CORD test environment]
Here are some series of the command to help with configuring br-mgmt and the tunnel. Do the same configuration on the compute-02 and head node. Once tunnels are created, you should be able to ping between head node and compute node with the new management network IP, 10.10.10.0/24 in this example.
sudo ovs-vsctl add-br br-mgmt
sudo ovs-vsctl add-port br-mgmt vxlan-c1 -- set interface vxlan-c1 type=vxlan options:remote_ip=10.90.0.58 options:local_ip=10.90.0.64 options:key=100
sudo ip link set br-mgmt up
sudo ip addr add 10.10.10.11/24 dev br-mgmt
sudo ifconfig br-mgmt mtu 1450
sudo ip link add veth2 type veth peer name veth3
sudo ip link set veth2 up
sudo ip link set veth3 up
sudo ovs-vsctl add-port br-mgmt veth2
Update the network configuration with the new management IP address by pushing the updated network-cfg.json to ONOS-CORD. Note that hostManagementIp is changed and hostManagementIface is added. Check cordvtn-nodes result if the node state is COMPLETE.
        "nodes" : [ {
          "hostname" : "compute-01",
          "hostManagementIp" : "10.10.10.11/24",
          "hostManagementIface" : "veth3",
          "dataPlaneIp" : "10.134.34.222/16",
          "dataPlaneIntf" : "veth1",
          "bridgeId" : "of:0000000000000001"
        }, {
          "hostname" : "compute-02",
          "hostManagementIp" : "10.10.10.12/24",
          "hostManagementIface" : "veth3",
          "dataPlaneIp" : "10.134.34.223/16",
          "dataPlaneIntf" : "veth1",
          "bridgeId" : "of:0000000000000002"
        } ]
vSG test: with XOS cord-pod service profile
To test vSG, it is required to create an emulation of the access device. In the compute node, install Docker, bring up a container, and connect the container to the fabric bridge.
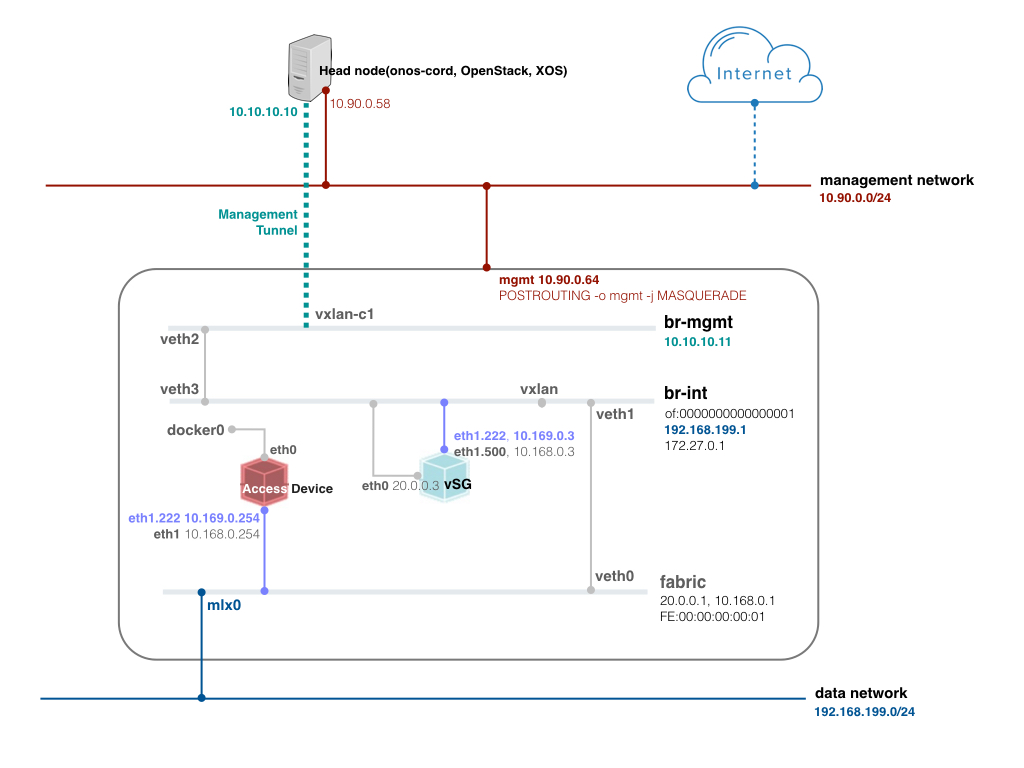
[Figure. vSG test environment]
$ sudo curl -s https://get.docker.io/ubuntu/ | sudo sh
$ sudo docker run --privileged --cap-add=ALL -d -v /dev:/dev -v /lib/modules:/lib/modules --name access-device -t ubuntu:14.04 /bin/bash
$ git clone https://github.com/jpetazzo/pipework.git && cd pipework
$ sudo ./pipework fabric -i eth1 access-device 10.168.0.254/24 fe:00:00:00:00:11
Inside the container, install VLAN package and configure the VLAN interface. With this, access agent is done.
$ sudo docker exec -it access-device /bin/bash
root@f4cab8cbe70e:/# apt-get update
root@f4cab8cbe70e:/# apt-get install vlan
root@f4cab8cbe70e:/# modprobe 8021q
root@f4cab8cbe70e:/# vconfig add eth1 222
Added VLAN with VID == 222 to IF -:eth1:-
root@f4cab8cbe70e:/# ip link set eth1.222 up
root@f4cab8cbe70e:/# ip addr add 10.169.0.254/24 dev eth1.222
Run a sequence of make from the XOS machine, under service-profile/cord-pod. Refer to this page for the details. After some time, you should be able to see three networks and one VM is created.
# neutron net-list
+--------------------------------------+-------------------+----------------------------------------------------+
| id                                   | name              | subnets                                            |
+--------------------------------------+-------------------+----------------------------------------------------+
| 4bec29ef-1b9a-455a-b10f-5685d64e5838 | management        | 54a3bd7c-6a23-43e2-bd25-108980f4063c 172.27.0.0/24 |
| 52cde55a-873b-4742-a2ab-72624e4c79be | mysite_vsg-access | 13461ca0-410a-4420-9127-ba5ee6922986 10.0.2.0/24   |
+--------------------------------------+-------------------+----------------------------------------------------+

# nova list --all-tenants
+--------------------------------------+--------------+--------+------------+-------------+---------------------------------------------------+
| ID                                   | Name         | Status | Task State | Power State | Networks                                          |
+--------------------------------------+--------------+--------+------------+-------------+---------------------------------------------------+
| 5f52f977-b864-4254-a736-0755ff39ce37 | mysite_vsg-1 | ACTIVE | -          | Running     | management=172.27.0.2; mysite_vsg-access=10.0.2.2 |
+--------------------------------------+--------------+--------+------------+-------------+---------------------------------------------------+
Check hosts result from ONOS if hosts with serviceType=VSG exists, one for vSG VM and the other for the additional IP addresses, 10.6.1.131 and 10.6.1.132.
onos> hosts
id=02:42:0A:06:01:83/None, mac=02:42:0A:06:01:83, location=of:00005254008de92e/5, vlan=None, ip(s)=[10.6.1.131], stag=222, vsgVm=FA:16:3E:3F:04:79/None, createTime=1480439608933, networkId=eab656cd-d795-4944-bf46-fda1bae4bfee, networkType=VSG, portId=75b3819e-fa3e-4202-b977-0baf9e48f341, nestedInstance=true, configured=false
id=02:42:0A:06:01:84/None, mac=02:42:0A:06:01:84, location=of:00005254008de92e/5, vlan=None, ip(s)=[10.6.1.132], stag=222, vsgVm=FA:16:3E:3F:04:79/None, createTime=1480439608931, networkId=eab656cd-d795-4944-bf46-fda1bae4bfee, networkType=VSG, portId=75b3819e-fa3e-4202-b977-0baf9e48f341, nestedInstance=true, configured=false
id=FA:16:3E:3F:04:79/None, mac=FA:16:3E:3F:04:79, location=of:00005254008de92e/5, vlan=None, ip(s)=[10.0.2.2], networkId=eab656cd-d795-4944-bf46-fda1bae4bfee, networkType=VSG, portId=75b3819e-fa3e-4202-b977-0baf9e48f341, createTime=1480439608927, configured=false
id=FA:16:3E:3F:4A:16/None, mac=FA:16:3E:3F:4A:16, location=of:00005254008de92e/6, vlan=None, ip(s)=[172.27.0.2], networkId=70cb36b4-38a5-4d25-90d8-73b0ddf8db9a, networkType=MANAGEMENT_LOCAL, portId=5611903b-c7fa-49a5-8c78-4267305e7dc0, createTime=1480439609389, configured=false
ubuntu@mysite-vsg-1:~$ ifconfig
br-wan    Link encap:Ethernet  HWaddr 02:42:0a:06:01:82
          inet addr:10.6.1.131  Bcast:0.0.0.0  Mask:255.255.255.192
          inet6 addr: fe80::42:aff:fe06:182/64 Scope:Link
          UP BROADCAST RUNNING PROMISC MULTICAST  MTU:1500  Metric:1
          RX packets:95 errors:0 dropped:0 overruns:0 frame:0
          TX packets:692 errors:0 dropped:0 overruns:0 carrier:0
          collisions:0 txqueuelen:0
          RX bytes:2660 (2.6 KB)  TX bytes:167226 (167.2 KB)

eth0      Link encap:Ethernet  HWaddr fa:16:3e:c1:4b:e9
          inet addr:10.0.2.2  Bcast:10.0.2.0  Mask:255.255.255.0
          inet6 addr: fe80::f816:3eff:fec1:4be9/64 Scope:Link
          UP BROADCAST RUNNING MULTICAST  MTU:1500  Metric:1
          RX packets:140 errors:0 dropped:0 overruns:0 frame:0
          TX packets:858 errors:0 dropped:0 overruns:0 carrier:0
          collisions:0 txqueuelen:1000
          RX bytes:14024 (14.0 KB)  TX bytes:189165 (189.1 KB)

eth1      Link encap:Ethernet  HWaddr fa:16:3e:bf:e3:e1
          inet addr:172.27.0.2  Bcast:172.27.0.0  Mask:255.255.255.0
          inet6 addr: fe80::f816:3eff:febf:e3e1/64 Scope:Link
          UP BROADCAST RUNNING MULTICAST  MTU:1500  Metric:1
          RX packets:2968 errors:0 dropped:0 overruns:0 frame:0
          TX packets:2668 errors:0 dropped:0 overruns:0 carrier:0
          collisions:0 txqueuelen:1000
          RX bytes:2414846 (2.4 MB)  TX bytes:429922 (429.9 KB)

eth0.500  Link encap:Ethernet  HWaddr fa:16:3e:c1:4b:e9
          inet6 addr: fe80::f816:3eff:fec1:4be9/64 Scope:Link
          UP BROADCAST RUNNING MULTICAST  MTU:1500  Metric:1
          RX packets:95 errors:0 dropped:0 overruns:0 frame:0
          TX packets:700 errors:0 dropped:0 overruns:0 carrier:0
          collisions:0 txqueuelen:0
          RX bytes:2660 (2.6 KB)  TX bytes:167874 (167.8 KB)

lo        Link encap:Local Loopback
          inet addr:127.0.0.1  Mask:255.0.0.0
          inet6 addr: ::1/128 Scope:Host
          UP LOOPBACK RUNNING  MTU:65536  Metric:1
          RX packets:0 errors:0 dropped:0 overruns:0 frame:0
          TX packets:0 errors:0 dropped:0 overruns:0 carrier:0
          collisions:0 txqueuelen:0
          RX bytes:0 (0.0 B)  TX bytes:0 (0.0 B)

ubuntu@mysite-vsg-1:~$ netstat -rn
Kernel IP routing table
Destination     Gateway         Genmask         Flags   MSS Window  irtt Iface
0.0.0.0         10.6.1.129      0.0.0.0         UG        0 0          0 br-wan
10.0.2.0        0.0.0.0         255.255.255.0   U         0 0          0 eth0
10.6.1.128      0.0.0.0         255.255.255.192 U         0 0          0 br-wan
172.27.0.0      0.0.0.0         255.255.255.0   U         0 0          0 eth1
- Can ping to 8.8.8.8
- Can ping to 10.169.0.254(olt container) from vsg-01
Example working flow rules on br-int.
$ flows br-int
OFPST_FLOW reply (OF1.3) (xid=0x2):
 cookie=0x8f00008b856b96, duration=580.938s, table=0, n_packets=0, n_bytes=0, send_flow_rem priority=55000,arp,arp_tpa=172.27.0.1 actions=LOCAL
 cookie=0x8f0000c7500b13, duration=580.938s, table=0, n_packets=0, n_bytes=0, send_flow_rem priority=55000,ip,nw_dst=172.27.0.1 actions=LOCAL
 cookie=0x8f0000362e311b, duration=580.938s, table=0, n_packets=0, n_bytes=0, send_flow_rem priority=55000,ip,in_port=LOCAL,nw_src=172.27.0.1 actions=goto_table:4
 cookie=0x8f00003515bbe1, duration=580.938s, table=0, n_packets=0, n_bytes=0, send_flow_rem priority=55000,arp,in_port=LOCAL,arp_spa=172.27.0.1 actions=CONTROLLER:65535
 cookie=0x8f0000d0106e81, duration=580.938s, table=0, n_packets=0, n_bytes=0, send_flow_rem priority=55000,vlan_tci=0x1000/0x1000 actions=goto_table:6
 cookie=0x8f0000da877abd, duration=580.938s, table=0, n_packets=0, n_bytes=0, send_flow_rem priority=50000,ip,in_port=2,nw_dst=10.10.10.11 actions=LOCAL
 cookie=0x8f0000d3552757, duration=580.938s, table=0, n_packets=0, n_bytes=0, send_flow_rem priority=50000,arp,in_port=2,arp_tpa=10.10.10.11 actions=LOCAL
 cookie=0x8f000074d39ef4, duration=580.935s, table=0, n_packets=0, n_bytes=0, send_flow_rem priority=50000,in_port=LOCAL actions=output:2
 cookie=0x8f0000ed741163, duration=580.938s, table=0, n_packets=0, n_bytes=0, send_flow_rem priority=50000,udp,in_port=2,tp_dst=4789 actions=LOCAL
 cookie=0x10000c42e0660, duration=582.631s, table=0, n_packets=148, n_bytes=6216, send_flow_rem priority=40000,arp actions=CONTROLLER:65535
 cookie=0x1000023908d2e, duration=582.631s, table=0, n_packets=48, n_bytes=16416, send_flow_rem priority=40000,udp,tp_src=68,tp_dst=67 actions=CONTROLLER:65535
 cookie=0x8f000066e841cf, duration=580.938s, table=0, n_packets=0, n_bytes=0, send_flow_rem priority=0 actions=goto_table:1
 cookie=0x8f000022735a10, duration=580.909s, table=1, n_packets=0, n_bytes=0, send_flow_rem priority=5000,ip,in_port=19,nw_src=10.0.2.2 actions=goto_table:2
 cookie=0x8f0000c7c9743e, duration=581.712s, table=1, n_packets=0, n_bytes=0, send_flow_rem priority=5000,in_port=3 actions=goto_table:4
 cookie=0x8f0000cf68a6be, duration=580.938s, table=1, n_packets=0, n_bytes=0, send_flow_rem priority=5000,in_port=1 actions=goto_table:5
 cookie=0x8f000095ef6462, duration=580.938s, table=1, n_packets=0, n_bytes=0, send_flow_rem priority=5000,in_port=2 actions=goto_table:4
 cookie=0x8f00009272b08c, duration=580.909s, table=1, n_packets=0, n_bytes=0, send_flow_rem priority=4000,in_port=19 actions=goto_table:3
 cookie=0x8f000085b770b7, duration=580.872s, table=2, n_packets=0, n_bytes=0, send_flow_rem priority=5000,ip,nw_src=10.0.2.0/24,nw_dst=10.0.2.0/24 actions=goto_table:4
 cookie=0x8f0000dfe6669d, duration=580.857s, table=2, n_packets=0, n_bytes=0, send_flow_rem priority=4000,ip,nw_dst=10.0.2.0/24 actions=drop
 cookie=0x8f000005dce554, duration=580.937s, table=2, n_packets=0, n_bytes=0, send_flow_rem priority=0 actions=output:2
 cookie=0x8f00000ff278af, duration=580.910s, table=4, n_packets=0, n_bytes=0, send_flow_rem priority=5000,ip,nw_dst=10.0.2.2 actions=set_field:fa:16:3e:ba:3c:8d->eth_dst,output:19
 cookie=0x8f00009da6819f, duration=580.884s, table=4, n_packets=0, n_bytes=0, send_flow_rem priority=5000,ip,nw_dst=172.27.0.2 actions=set_field:fa:16:3e:54:96:01->eth_dst,output:20
 cookie=0x8f0000e77097b9, duration=580.834s, table=4, n_packets=0, n_bytes=0, send_flow_rem priority=5000,ip,nw_dst=10.6.1.132 actions=push_vlan:0x8100,set_field:4596->vlan_vid,set_field:fa:16:3e:c1:4b:e9->eth_dst,output:19
 cookie=0x8f0000ceb4a394, duration=580.834s, table=4, n_packets=0, n_bytes=0, send_flow_rem priority=5000,ip,nw_dst=10.6.1.131 actions=push_vlan:0x8100,set_field:4596->vlan_vid,set_field:fa:16:3e:c1:4b:e9->eth_dst,output:19
 cookie=0x8f0000303c1464, duration=580.904s, table=5, n_packets=0, n_bytes=0, send_flow_rem priority=5000,tun_id=0x415,dl_dst=fa:16:3e:c1:4b:e9 actions=output:19
 cookie=0x8f0000ab8c83b0, duration=580.937s, table=6, n_packets=0, n_bytes=0, send_flow_rem priority=50000,arp,dl_vlan=500 actions=CONTROLLER:65535
 cookie=0x8f000035b43b16, duration=580.834s, table=6, n_packets=0, n_bytes=0, send_flow_rem priority=5000,in_port=2,dl_vlan=222 actions=output:19
 cookie=0x8f0000a74795cb, duration=580.834s, table=6, n_packets=0, n_bytes=0, send_flow_rem priority=5000,in_port=19,dl_vlan=222 actions=output:2
 cookie=0x8f00008f29b66d, duration=580.937s, table=6, n_packets=0, n_bytes=0, send_flow_rem priority=5000,dl_vlan=500 actions=pop_vlan,output:2
Access agent test
To test access agent, it is required to push additional network configuration. VTN only cares for vtn-location field(line number 9) and the value of this field should be the location of the access agent container. In this example, the access agent is going to be connected on the compute-01 br-int (of:0000000000000001). For the port number, check the current highest port number of the of:0000000000000001 device in ONOS, and put the next number (OVS increases port number one by one for the new port). Or you can push this network configuration after access agent is created and then run cordvtn-node-init compute-01. It will try to reconfigure the data plane with the latest configuration.
{
    "devices": {
        "of:0000000000000001": {
            "accessAgent": {
                "olts": {
                    "of:0000000000000011/1": "fe:00:00:00:00:11"
                },
                "mac": "fa:00:00:00:00:11",
                "vtn-location": "of:0000000000000001/6"
            }
        }
    }
}

[Figure. Access agent test environment]
Now create another container for the access agent and add one interface to br-mgmt and the other to br-int.
sudo docker run --privileged --cap-add=ALL -d --name access-agent -t ubuntu:14.04 /bin/bash
sudo ./pipework br-mgmt -i eth1 access-agent 10.10.10.20/24
sudo ./pipework br-int -i eth2 access-agent 10.168.0.100/24 fa:00:00:00:00:11
Once the container is up, check hosts result from ONOS if hosts with serviceType=ACCESS_AGENT exist.
onos> hosts
id=FA:00:00:00:00:11/None, mac=FA:00:00:00:00:11, location=of:0000000000000001/6, vlan=None, ip(s)=[], serviceType=ACCESS_AGENT, vtnPortId=N/A, serviceId=N/A, createTime=1471563978887
The access device and the access agent communicate with some L2 layer protocol. To test L2 layer connectivity, we're using arping but needs to stop ONOS for test to avoid the controller takes all the ARP request. And remove the rules to send ARP to controller from the compute-01.
onos-service stop
sudo ovs-ofctl -O OpenFlow13 del-flows br-int "arp"
Attach to the access agent container, install arping and try arping to the access device container. And try ping to the head node, too.
$ sudo docker exec -it access-agent /bin/bash
# apt-get update
# apt-get install arping
# arping 10.168.0.254
ARPING 10.168.0.254
42 bytes from fe:00:00:00:00:11 (10.168.0.254): index=0 time=1.001 sec
42 bytes from fe:00:00:00:00:11 (10.168.0.254): index=1 time=1.001 sec
- Can ping to head node, 10.10.10.10 in this example
- Can arping to the access device's eth1 address, 10.168.0.254