Introduction
Background
Typically in CORD, the orchestrator (XOS) would instantiate containers or VMs in compute nodes and inform the fabric (via REST-API) of the IP/MAC and location of the instance. Without the use of XOS, it was necessary to configure the end-hosts (eg. compute nodes) in ONOS via the NetworkConfigHostProvider. With the use of a DHCP server and the ONOS dhcprelay app, this limitation has been removed. It is no longer necessary to configure the fabric with this information, as ONOS can learn the location, mac address, vlan-id and DHCP assigned IP address via the dhcprelay app, during the DHCP discover/offer/request process.
In this release, we add the following new capabilities:
It is no longer necessary to configure mac address of the DHCP server in the relay app config. ONOS will automatically discover the MAC and VLAN associated with the DHCP server IP address.
The DHCP relay app is vlan-aware. The server and clients could be any mix of tagged or untagged hosts in same or different vlans.
The DHCP server need not be physically connected to the fabric. It could be located “behind” an external gateway router.
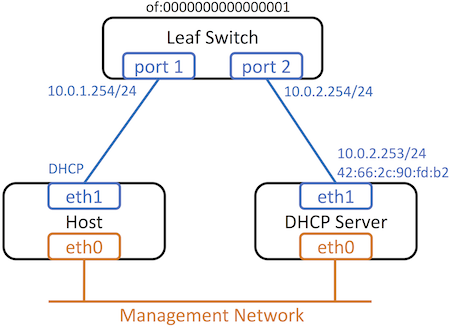
Configuration
The dhcprelay app makes one major assumption → It assumes that the DHCP Server is connected in the data-plane, i.e the DHCP server is either connected to the fabric in one of the reachable subnets; or it is reachable by a gateway router that itself is connected to the fabric in the dataplane. We treat these cases separately.

Configure ONOS
Configuring a DHCP Server connected to a Fabric leaf switch
In this case, the configuration involves first configuring the switch interface with the vlan/subnet the DHCP service is part of.
For example, if I have a switch (of:205) with a DHCP server on port 24 on vlan 20, the port config looks like:
"of:0000000000000205/24" : {
      "interfaces" : [ {
        "name" : "dhcp-server-intf",
        "ips" : [ "10.0.2.254/24" ],
        "vlan-tagged" : [ 20 ]
      } ]
    }
A second part of the configuration for the DHCP relay app requires a json configuration under the key apps:
"apps" : {
      "org.onosproject.dhcp-relay" : {
         "dhcprelay" : {
              "dhcpserverConnectPoint": "of:0000000000000205/24",
              "serverip": "10.0.2.253"
         }
      }
    }
Note that the dhcprelay app is configured with location of the DHCP server (the switchport to which it is connected to the fabric). It is also configured with the DHCP server IP, but it is no longer necessary to configure the MAC address of the server. ONOS will automatically learn the MAC and VLAN corresponding to the serverIP.
Configuring a DHCP Server reachable via external router
In this case, it is actually the external router that is directly connected to the fabric. This external router is already configured in the ports section of network-config (for vRouter functionality). For example, if the external router is connected to switch of:205 on port 1
 "of:0000000000000205/1" : {
      "interfaces" : [ {
        "ips" : [ "192.168.101.2/30", "2000::c0a8:6402/120" ],
        "mac" : "a2:9b:32:9d:7f:b3",
        "name" : "internet-router"
      } ]
    }
As before the “ips” and “mac” configured on port 1, actually correspond to the addresses configured in Quagga.
The app config in this case, includes an additional field necessary to inform the dhcp-relay app of the gatewayIP through which the DHCP server can be reached.
"apps" : {
      "org.onosproject.dhcp-relay" : {
           "dhcprelay" : {
                "dhcpserverConnectPoint": "of:0000000000000205/1",
                "serverip": "10.0.2.253",
                "gatewayip": "192.168.101.1"
           }
       }
    }
Note that the dhcpserverConnectPoint should now be the switchport to which the external router is connected to the fabric.
Configure DHCP server
Install DHCP server
Modern DHCP servers should support relayed DHCP request. However, the way to configure them are probably different case to case. Here we use isc-dhcp-server on Ubuntu as an example.
To install the DHCP server, simply run:
sudo apt-get install isc-dhcp-server
Configure DHCP server
Two configuration files are required by DHCP server.
First, we need to specify which network interface the DHCP server should listen on. To do that, we need to modify /etc/default/isc-dhcp-server and change the following line.
INTERFACES="eth1"
Next, we need to specify the subnet we want to lease. To do that, we need to modify /etc/dhcp/dhcpd.conf and add the following lines.
Note that the subnet of eth1 needs to be included. Otherwise, the DHCP server will not listen to the interface even though we have specified that in /etc/default/isc-dhcp-server.
subnet 10.0.1.0 netmask 255.255.255.0 {
  range 10.0.1.1 10.0.1.240;
  option routers 10.0.1.254;
}

# A subnet that matches the interface IP address is required by isc-dhcp-server
subnet 10.0.2.0 netmask 255.255.255.0 {
  range 10.0.2.1 10.0.2.240;
  option routers 10.0.2.254;
}
Finally, restart the DHCP server.
sudo service isc-dhcp-server restart
Testing
The host should be able to obtain an IP address from the pool we specified (10.0.1.1-240). Try to run dhclient and see if the host can get an IP address.
sudo dhclient eth1
If something goes wrong, check /var/log/syslog for DHCP server log and run tcpdump on DHCP server to see if the DHCP packets from the host reach the server correctly.
Reference